Do you know compression? If not, don’t worry because today I’ll explain to you why and when you need compression, along with some use cases so you can really understand it.
As the name says, it helps you compress something, but do you really know to set your parameters accordingly? To clarify, I’m not talking about musical format compression like WAV to MP3, but compression of a drum sample or a vocal to achieve a more even sound in it.

Compression is an audio processing operation with a lot of purposes, although mostly well known for reducing the dynamic range of an audio signal. Besides reducing the dynamic range, it can bring character to a track as well as enhance a particular sound or frequency range.
Today, we’re talking about why and when you should use compression along with different use cases of compression that I’ve done along the years. Here are the topics we’ll cover today:
- Compression to Control the Dynamic Range
- Compression for Sound Shaping
- Compression to Saturate
- Compression to Generate Rhythm
- Compression to Dynamically EQ
- Understanding the Parameters
- Determining Compression Parameters
- Compression in Mastering
- Compression & Kicks
- Compressing Instruments
- Compression & Vocals
Let’s Dive Right In!
Compression to Control the Dynamic Range
Compressors can come in handy when you’re trying to control the dynamic range of a sound. This use of compressors is commonly placed in master chains, when your primary intention is to control how loud the sections of the track are according to the average sound of the track. By placing a compressor there, you’ll be able to diminish or expand the dynamic range, making the overall listening experience more controlled to the listener.
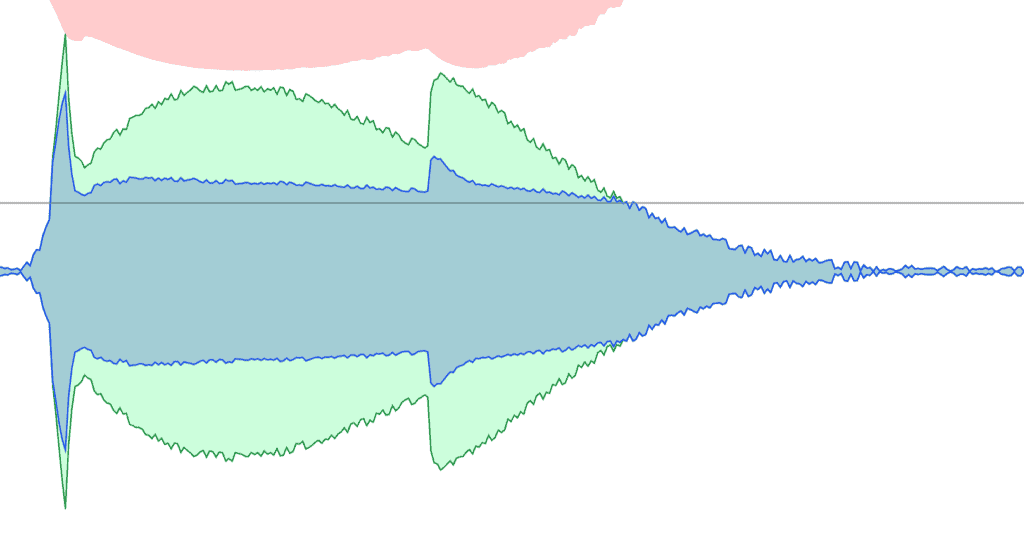
Below, we have an example of how compressors affect the dynamic range of audio signals.
- RED: The amount of compression
- GREEN: The original audio signal
- BLUE: the resulting audio signal
Look at the image below and check how the compression is making the sound less dynamic and more even when compared to the original sound.

Compression for Sound Shaping
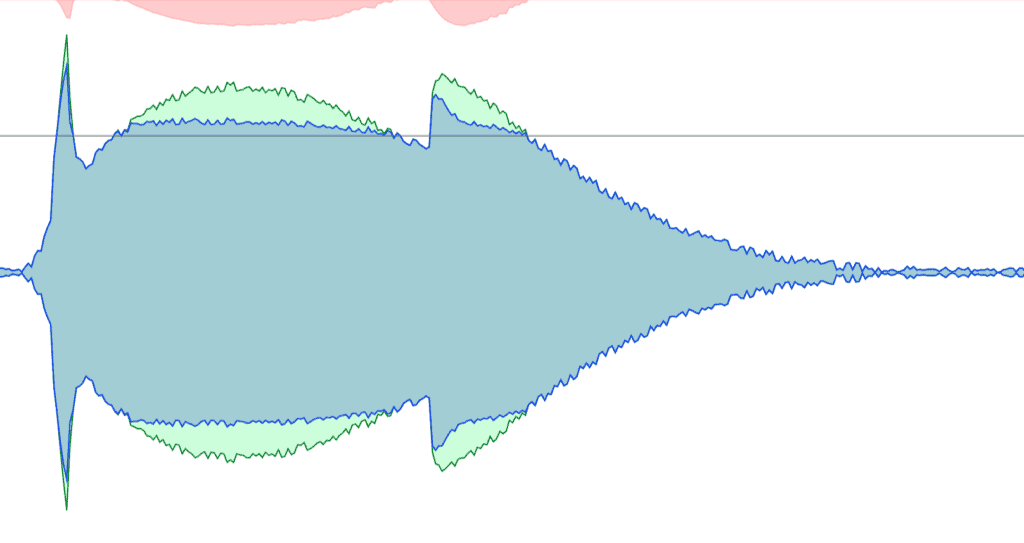
Because of the dynamic range abilities compressors allow, you can shape sounds to have more attack or longer tails, to name some shaping examples. In the first example, to have more attack, you can set a compressor to have a slow attack, and this would give you a bigger attack/body ratio than what your original sound would have. Check the image below and check how the initial transient is now much louder than the rest of the body of the audio signal.

Compression to Saturate
Some analog compressors designs, back in the day, had not only the purpose of compressing the dynamic range of a sound, but also the purpose of giving warmth to a sound. Therefore, these compressors would also act as saturators since they would enhance certain harmonics of the audio signal. Tube compressors act differently than a normal stock compressor and, thus, have a different result from the one I’ll propose, you can try to reach a saturation type by being intense with any stock compressor.
Pick the stock compressor of your DAW, put the threshold in a 4:1 proportion, attack in 0.80 ms and release as fast as it can be (1.0ms, for example). Now, select any element, like Rhodes, and apply this compressor to it. Now, move the threshold until you hear some distortion to it. There you go.. Compressors as saturators.

Specially in electronic music production, compressors are used with the sidechain feature enabled. In a practical explanation, a sidechain is when you use another sound as a trigger for your compressor to be active, like when you sidechain your bass to your kick.
Compression to Generate Rhythm
One reason sidechain is used in electronic music is to create a pumping effect to the sounds. That driving effect generated by the sidechain helps create a groove that electronic music is really famous for.
Recently, these compressors have been substituted by volume automation plugins that emulate the compressors being sidechained by the kick. They are, however, doing the same as a compressor would.
Compression to Dynamically EQ
Another use of compressor is to dynamically EQ certain elements with the sidechain feature to avoid conflicts like phase cancellation. The kick and bass is the most famous example of sidechain, but, essentially, it’s a dynamic EQ. When the kick comes in, it turns all the frequencies of the bass down.
In addition, you can also sidechain a specific region of your chords to a vocal so when the vocal comes in, that region would be compressed. Again, what you’re doing is lowering the volume of a specific eq band when a certain element is present, which is one of the purposes of a Dynamic EQ.
Understanding the Parameters
Threshold is how loud does your audio signal need to be for the compressor to act. It will compress everything above the threshold in the desired ratio.
Ratio is the proportion in which the exceeding audio sound will be compressed to. If a compressor has a 2:1 ratio, this means that for each exceeding 2 dbs, it will compress to 1 db. The picture below shows a 2:1 compressor, where the exceeding sound in GREEN is compressed to half (50%) of it.

If the compression ratio was 4:1, then the exceeding sound in GREEN is being compressed to 25% of it (1/4 = 0.25)

Attack is how fast your compressor will act once it reaches the threshold. An attack of 3 ms means that the compressor will wait 3ms after the audio signal has reached the threshold to act. The same 4:1 setting with a slower attack leaves us with bigger transients.

Release is how fast your compressor will disengage after the audio signal is no longer exceeding the threshold. Continue our example, when increasing the release time, check how the compressor is still acting on the audio signal below the threshold. This is because the threshold reached the threshold and is waiting for the release period to end before it disengages.

Determining Compression Parameters
A couple questions come to my mind when I’m compressing anything and deciding its parameters:
- What do you want to achieve with this?
If you don’t know how to answer this question, you probably don’t need a compressor now. You feel you need one, but you want to use a compressor more than you probably need one.
- What properties do I want to enhance with this compression?
Do you want more attack? Do you want to “sausage” it up, i.e., do you want to make the volume more even? Do you want to bring out harmonics? This is crucial for you to determine the parameters. Let’s revisit them:
- Threshold is how loud does your audio signal need to be for the compressor to act.
- Ratio is the proportion in which the exceeding audio sound will be compressed to.
- Attack is how fast your compressor will act once it reaches the threshold.
- Release is how fast your compressor will disengage after the audio signal is no longer exceeding the threshold.
Knowing this all you can infer what you need to do based on what you want to achieve. If you want to enhance the initial transient, a slow attack will let the kick attack pass through before it is active.
If you want to sausage it up, a fast attack would capture all transients and a fast release would not over compress parts not exceeding the threshold.
If you want to play around with these parameters, head over to this website, which is where I took the images above from.
Compression in Mastering
I view compressors in mastering having three usages: softening long peaks, enhancing attacks and balancing volume of sections.
In my master chain, I use an OTT with 10% of dry/wet, which already gives a first wave of multi-band compression. I do some slight eqing when necessary, and then I run it through a glue compressor. This second compressor softens the long peaks for the limiter afterwards. It’s a very slow compressor, 30ms of attack, with a 100 milliseconds of release (.1 S).
I did some testing with my tracks with and without this compressor and I noticed that the song sounds much cleaner with it than without, mainly because it already takes that first hit of compression.
The reason for that is that you don’t want to kill the transients of the kick and you want the compressor to disengage as soon as possible so it’s not compressing where it shouldn’t. In addition, due to the slow attack, it will only compress if a major part is exceeding the threshold and not quick peaks, not killing the overall dynamic of the song, but mainly capturing major trends of threshold excess.
Another thing I noticed when using this compressor is that it helps balance the volume throughout the sections. If I have a drop 1 that is too loud and a break that is too quiet, this would normally be compressed. As much as I feel I should fix this during the mixing stage, it’s another safety net I have for it.
Compression & Kicks
I don’t compress my kicks, and this has several reasons. However, I would compress kicks for only one reason and, at the same time, I will answer why I don’t use compressors normally. Here are the reasons:
- I want to make the kick attack louder – why not use an EQ for that?
- I want to make the bass part of the kick louder – why not use an EQ for that?
- I want to make the bass part of the kick more uniform – Ok, this is a fair use of it
Why don’t I normally use it? Since my way of finding kick samples is by listening to other tracks and ripping kicks I like, I don’t really need to compress something I’ve already liked in the first place.
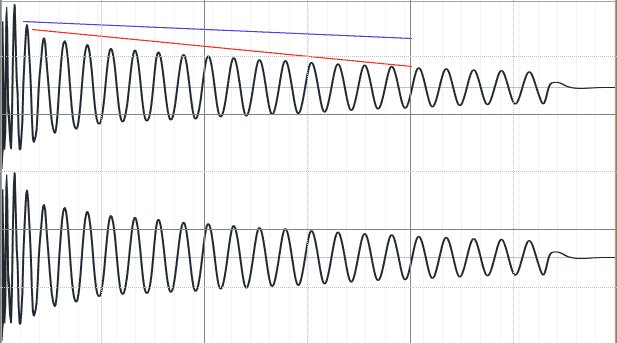
If you’re not ripping kicks, I would only recommend compressing kicks if you want to make the bass part of your kick more uniform. In the kick below, let’s say you want the bass part to be flatter (blue line) and not downwards (red line) as it is. For this use, a compressor could be handy here:

If you don’t know how to answer this question, you probably don’t need a compressor now and I’d recommend checking the first post. You feel you need one, but you want to use a compressor more than you probably need one.
Compressing Instruments
Again, it depends on your purpose. Let’s talk about pianos and guitars, where I’ve done opposite things with compressors to achieve opposite results.
Once, I wanted to make the piano as a sustained chord while also keeping the transient, so I stacked three compressors with slow attack, fast release and a 10:1 ratio. This way, the transients would be kept, but all the rest would be really squashed.
Another time, I wanted to make a guitar flatter since they were analog and needed to have a more even volume throughout its length. I didn’t really care for the transient since it wasn’t a strummed guitar, so I put a fast attack and slow release there. The ratio was 3:1 since I wanted a bit of variance throughout its length so it wasn’t too robotic/sausagy.
As you can read above, it all depends on what you want to achieve with it. There is no right or wrong here as the same element can have different purposes and, therefore, requires different treatment.
Compression & Vocals
Another common use of compression is for vocals. If you look at how a raw vocal’s waveform, you’ll probably see something like this:

You can see that there are moments where the vocal is too loud (orange) and moments where the vocal is too quiet (yellow), which would be unpleasant to listen to without a compressor. Since you need a uniform vocal throughout its length so the listener can understand everything the vocal is saying, this is a situation where you will need a compressor, or maybe two.
For this vocal specifically, I used two famous compressors for vocals: LA-2A and UA-1176, all digital versions of it. Although they don’t feature a threshold knob, which is odd for a compressor, they were highly used for Michael Jackson’s vocals, for example. You can read more about vocal mixing right here.

For both of them, you can see above that I dialed them until their GR-Meter hit on average 3db, although it’s peaking at -5db of reduction on the vocal I’m working with. The attack was around the 3 mark, which means an attack of approx. 0.4ms and a similar release. In other words, the attack is fast, but still letting a little transient go by so we don’t initial peaks of it.
———————
I want to hear from you now!
This compression series steps into a territory which I think is a bit crowded. If you close the browser understanding what to do when you want to enhance transients or make a sound flatter, i.e., with more even volumes, I’d consider the mission as accomplished!
Which of these techniques do you view yourself applying to your tracks first?
Let me know in the comments below and tell me.
