Today, we’re talking about my top 10 technical mistakes that I’ve made during my 10 years of music production.

Over the years, I’ve made several mistakes while producing, some were career related, and now I’m sharing 10 things I wish I knew when I started producing, back in 2010. By correcting these mistakes and persevering, I was able to release my tracks at Armada, like the one below:
Here’s a list of all the mistakes we’re talking about today:
- Just Copied the Settings From Someone;
- Thought Mastering Would Save My Crappy MIX;
- Thought That Less Was Always More;
- Layering Too Much;
- “The More I Process It, the Better It Will Sound”;
- Didn’t Do Low End Cuts Correctly;
- Creating Without a Vision;
- Not Using Any Eq Matching Tool;
- Being Too Much of a Perfectionist;
- Not Checking My MIX in Mono.
Let’s dive right in!
Just Copied the Settings From Someone
“If XXXX does that, maybe I’ll do exactly the same on my track and it will work.”
And then, frustration kicks in because besides being able to reproduce the same settings , it may not sound as exciting/good as when XXXX did it.
The problem is that when we start producing, we copy the actions, not the concepts of what famous producers/youtubers are doing. Therefore, we don’t adapt the actions, we just copy/paste what has worked in one context to our totally different concept and expect it to work as it did for the instructor.
Can I tell you a secret… It doesn’t, and it could harm you more than it helps you.
TIP #1: Understand the concepts behind the producer’s actions.
“In the studio with” or “Walkthroughs” are helpful as long as you can understand why and how to adapt to what’s happening in your track. If you simply copy/paste it in your track, it could work, but not necessarily a guarantee.
What you need to understand when watching tutorials is the concept behind the action, and not the action itself. Understand it, and you’ll be able to reproduce it, and not replicate it.
Thought Mastering Would Save My Crappy MIX
Back in 2015, I did a remix in a remix contest from Tritonal and I hired Wrechiski to master my track. My goal with an audio engineer, at that time, was that he would turn water into wine, which obviously didn’t happen.
The master came and I was “meeh” and began wondering if he was a good audio engineer. Now, I know he’s an amazing audio engineer, and you can listen to one of his songs from his Drum ‘n’ Bass alias below, but my expectations about my master were wrong.
What I didn’t know at that time was that I refused to accept that my mixing was bad and Wrechiski wasn’t mixing my track. He was only mastering it and that’s it. Therefore, a crappy mix would become a crappy end product, period.
TIP #2: Don’t make the mistake of thinking that a master will save your mix. On the contrary, a bad mixing decision will only be enhanced during mastering. Thus, if you have a problem with your mix, fix it in the mixing stage and don’t think you or your mastering engineer will save it because it won’t.
Thought That Less Was Always More
Less is more, but is it always?

Because of this “known truth” of music production, I often left my tracks without channels that would have enhanced them because of the sole reason that “less is more”, and these were huge mistakes. Sometimes I even deleted some channels because I thought I had to make my project smaller for the own sake of making it smaller
But, honestly, enough is more, not less. The amount of channels or plugins within a project does not matter, as long as you have a compelling reason for it. If you do, leave it since it’s probably serving a purpose.
TIP #3 Enough is more, which can be 10 or 200 channels. It doesn’t matter how many channels you have as long as you have a purpose for all of them being there.
Less is more when you’re stacking layer after layer without a clear reason, hoping to make it better. At the same time, my track Gravity has 212 channels and I can tell why each channel is there.
Layering Too Much
After the “Less is more” mentality, I soon switched to a “just create another layer to make it fuller” mentality, which led me to the mistake of channel overusage.
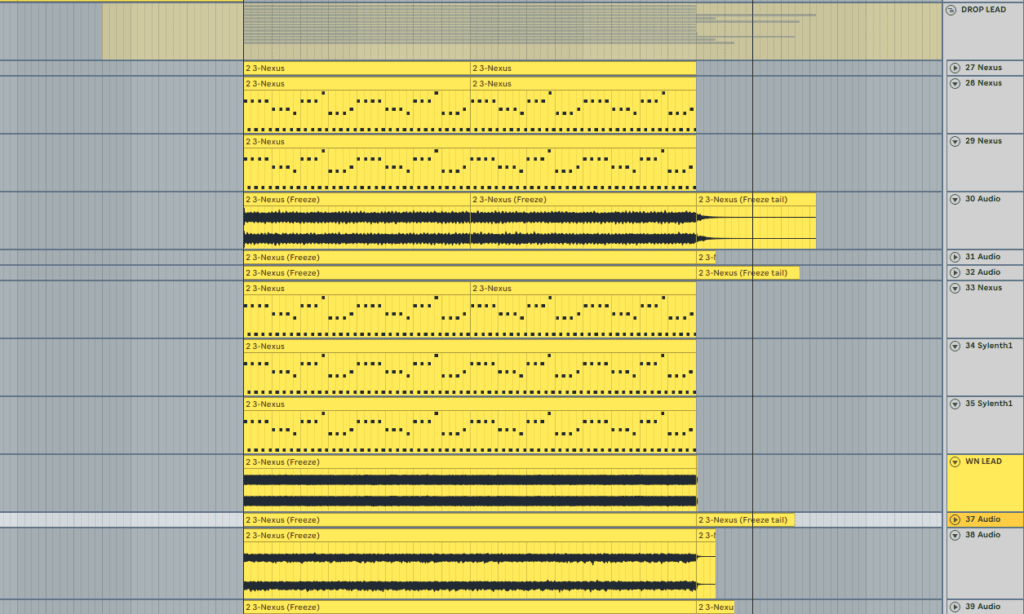
Just to show a track I started in Jan/2015, the picture below shows ONLY the “Drop Lead” group, and all 12 channels are doing the same thing, sound and mid below:

The problem with overlayering was that I created a lead that was too crowded or too hard to mix. In addition, the problem was that I didn’t know how to do what I wanted, so I thought putting a lot of sounds together could make it better. A little secret, it doesn’t, and it could actually make it worse.
If you don’t know how to make a specific sound, search on Youtube and most likely you’ll find some presets for that. The most important part, however, is understanding the sound design behind the preset, so you can replicate it afterwards.
TIP #4 Go learn sound design. If I knew sound design, I would know how to make what I wanted to with one channel, which is what I should have done in the first place. I talk a little more about Sound Design and how to properly learn it in my post about Sound Design.
“The More I Process It, the Better It Will Sound”
After I saw someone not layering as much as I did and saw that everything was achieved with effects, then began the “Process the hell out of something” phase. What was correcting one mistake ended up generating another.
The process was:
- You download Waves, Fabfilter, T-Racks and/or iZotope plugins and throw at least 5 plugins in each channel;
- Pick 5 plugins you think could work and throw it in one synth channel. Why? “Somehow it will be better”.
The problem? I solved the layering problem by creating a mixing problem since I was throwing those plugins in without thinking how they could affect my mix. For example, I’ve distorted/saturated a sound right after I did and Low End Cut many times, which is wrong because the distortion could bring in all those low end frequencies back.
Tip #5: If you don’t know how to use a plugin or don’t know why you’re adding it, take it off. If you don’t know the correct order you should put your plugins, go to Youtube and try to find how people do it.
Understand how the processing chain will affect your sound, otherwise your mix could be in trouble since it could actually do the opposite of what you’ve intended.
Didn’t Do Low End Cuts Correctly
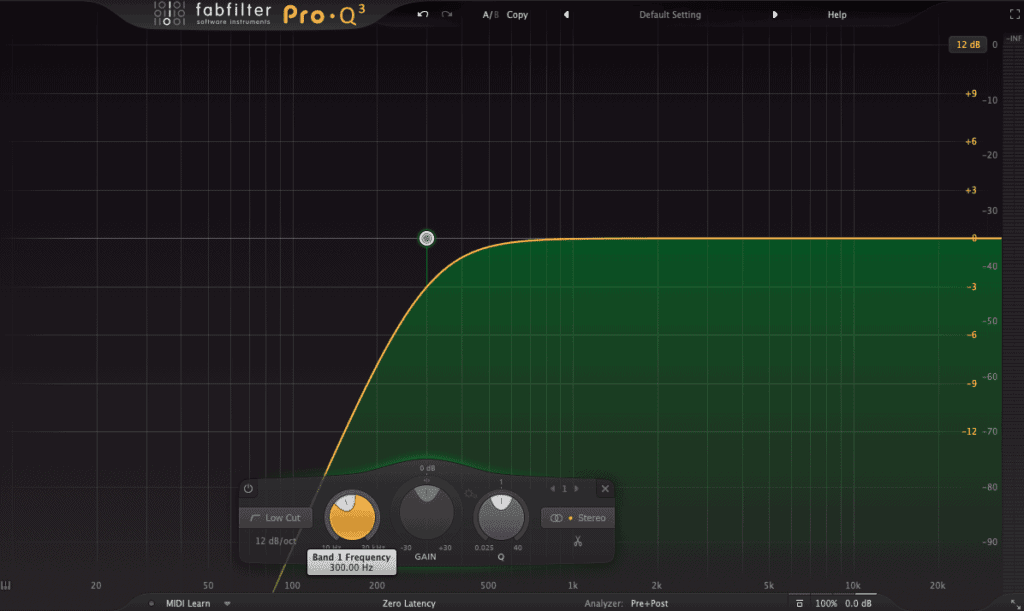
Back in 2013, I didn’t know that if you didn’t cut the low end of elements, your mix could be a mess in the end, and so they did. So, I discovered Low End Cuts and after that it was “Low End Cuts for the rescue!”.

Then, I started doing blind cuts at 300hz for non-bass elements, always, which is also is a mistake. Again, I was going blindly at this frequency, not considering the key of my track, and my tracks ended up bassless and, therefore, energyless.
The problem with not cutting the low end is that you can overcrowd your low, which could:
- Saturate your low end;
- Make your track quieter than others;
- Have no definition in the low end.
The opposite is also true. Low cutting everything blindly can mess your tracks up by making them powerless and energyless since most of the energy of these tracks comes from the low end. And this applies not only to Low Cuts, but all EQ adjustments you’re making.
TIP #6 Understand why you’re cutting the low end and what the purpose is for that move. Until you start understanding this, you won’t be able to properly mix your low end, so I highly recommend you to study this. You can start by checking this post I wrote about low end.
A quick tip, download my low end mixing ebook and I’m sure you’ll be able to solve all your low end issues and possible mistakes.
Creating Without a Vision
Back in the beginning, when it was time to create, I only focused on the current section of the track without actually thinking about the full arrangement I wanted. I was simply creating without purpose or goal, which normally led me to huge tracks and/or tracks that were repetitive or didn’t have a purpose.

Do you think Elon Musk sat down once in his office and said: “Ah, I’m going to start working on some stuff here and check if this takes me to space”. I’m sure he had a vision for what we wanted, and had ways to keep him accountable to stay in his vision when he wanted to go out of it.
By having a vision of what you want to achieve, you’ll be able to draw an end goal to yourself and your project, which could lead you to a more direct and objective approach towards your project. Before starting a track, stop and try to think what kind of track do you want to make:
- Will it have a vocal?
- How will be the drop 1? What about drop 2?
- What key are you creating the track in? How will this affect your mixing afterwards?
- How long do you want this track to be? How long do you want the largest section to be?
Tip #7: Have a plan for what you want to make, how long will it be and how do you plan to make it before you even start to produce the track, even if you’re just copying someone to learn. This can make your track more concise and to the point you want to make. Not only this, but this could help you with a more cohesive storytelling.
Not Using Any Eq Matching Tool
I remember when I started I referenced a lot, especially the arrangement, but when it comes to mixing and mastering, I simply mixed out of my head and did some slight A/B checks relying solely on my ears, and that’s one of the biggest mistakes I’ve made so far. This all changed when I watched this video:
This video showed me how an EQ matching tool could be a guide to a wrong mix, showing what’s possibly wrong with it compared to your reference track. Nowadays, I can’t live without a Matching EQ plugin, which will match the frequencies of your track to your reference track.
Sometimes, my ears may be tired or I’m mixing on my headphones due to time and this visual reference guide helps me stay inside what I first wanted for my tracks. Therefore, EQ Matching tools are a MUST have on my mixes nowadays. If you don’t have any, you can check the Metric AB, EQ Match from Ozone, Master Match from T-Racks and many others.
TIP #8: You must have a proper reference guide in place for your arrangement and later for your mixing and mastering. You don’t need to copy everything, but you as a reference guide to make sure you’re on par with what you like. I recommend referencing with your ears, but also having a visual reference plugin to make sure your ears are not fooling you.
You can check the following video to understand how I use my Match EQ Tool:
Being Too Much of a Perfectionist
“I need to tweak this knob from 0.74 to 0.75”, “What if that low end was 0.3db louder”. “This vocal shot could be 0.2db higher”. I invite you to do a Blind Testing at 0.2 dB Level Difference on this website.
Honestly, these changes are so unnecessary and are mostly in our and not something we NEED to. What’s the problem with doing it? If you get this mindset when going to mixing, something that is supposed to take 2-3hr is going to take a month and a lot of your hair.
This could make you lose interest in mixing since “it normally takes so long” or you might “get so frustrated over tweaking stuff”. Not only this, but the minuscule tweaks you make barely will be noticeable, so you’re possibly doing them because of self-obsession or perfectionism. However, what is perfect to you won’t be perfect to someone else, which invalidates this “seek for perfection”.

TIP #9: Avoid perfectionism since it can lead to obsessive tweaks of your track, leading you to an inefficient workflow and, as a possible consequence, to procrastination. Perfectionism is mistake, not a quality.
Not Checking My MIX in Mono
One of the crucial things of mixing and one I got from this video from the Recording Revolution TWO YEARS after I’d started to produce is that you need to check your mix in mono. I still think that your mix should not be done 100% in mono as the video suggests, but you always should be aware of how your mix sounds in mono and stereo.
How can you say mixing in mono doesn’t work? I’ve tested mixing in mono several times and I’d say that I do it every two years to make sure it is still not my favorite. The main reason for that is that electronic music has a lot more elements than a band, and some elements are fully stereo.
For example, if you check Icarus, by Madeon, in mono, you’ll listen that the song loses a lot of the energy, especially from the chords:
Is this wrong? Well, Icarus has 25M plays on Spotify, so I wouldn’t say people think it’s a problem. On the other hand, Madeon never did this kind of mixing anymore for one of his tracks and all his future tracks have more mono presence. That could have been intentional, but if it wasn’t, toggling mono would show off this “issue”.
TIP #10: When mixing your tracks, toggle between mono and stereo to check if the feeling of your track is the same in mono and stereo. Sometimes we have elements so wide that they disappear when in mono, as happened during Icarus. Although not wrong, I’d recommend your song to be as equally good in mono as it is in stereo.
Now it’s your turn
There you have it: my list of 10 top technical mistakes that I would have avoided if I could go back in time.
Now I’d like to hear what you have to say:
Which mistake from this list are you going to fix first?
Let me know in the comments below!
Hey Leo! Thanks for the great newsletter. I enjoyed this very much! Concerning the low cuts, I can suggest doing a low shelf, not to loose the entire energy. Cheers, Axel
Yeah Axel. I still use low cuts, but now used carefully and according to the melody!!
Great Article!
Thank you Danis!!
Thank you man! ??
=DD
We were doing promiscuous low end cuts for a while as well. And started to have thin tracks and mixes. Same thing with sidechaining. We would sidechain many things too much to “create room for the kick” but it sounded unnatural and weak
Exactly!! It’s all up to the point that it sounds nice, but not weak or unnatural.
I definitely have been guilty of all of these at some point. I think right now the things I need to work on the most is using reference tracks for EQ/mixing, and also having an overall vision for where my track should flow rather than just using the arrangement/flow of a reference track. How do you decide what key for a track to be in?
Depends.. I always start in F# or F since these are the keys I have most familiarity with. Then I put it up or down to what sounds best. How do you do it?