Today, we’re talking about another crucial part of vocal mixing, which is putting the right FX.

In the last post, we started talking about specific vocal mixing tasks like comping, audio correction, time syncing and tuning. These techniques will make the vocals sit better along with the song, but that’s not enough.
To complete your vocal mixing training, I’ll explain the method that was used by Taylor Torrence on his track ‘If We Say Goodbye’, supported by Armin van Buuren, and shared in his Facebook Walkthrough. Taylor helped with the concept and then I applied it to Find My Own, which you can listen to below:
So if you want to be able to mix it yourself in your next track, this post is for you. Here’s what we’ll cover:
- Insert or Return FX
- Vocal Mixing Chain Overview
- Vocal Compression Chain
- Vocal Delay Chain
- Vocal Reverb Chain
- Additional Vocal Channels
- Are There Other Ways?
Insert or Return FX?
As with everything in music, it depends. I’ve tried both adding all as Inserts and all as a Return Channel, but I’ve always achieved better results with a combination of both inserts and returns at the same time for vocal mixing.
To clarify what I’m talking about, ‘insert effects’ are FX applied directly to the channel, so every change you make changes the signal and goes directly to your master chain. If you use a ‘return effect’, you’re sending audio from one audio/midi channel to the return channel with FX, so you can use effects that don’t directly apply to the dry signal.
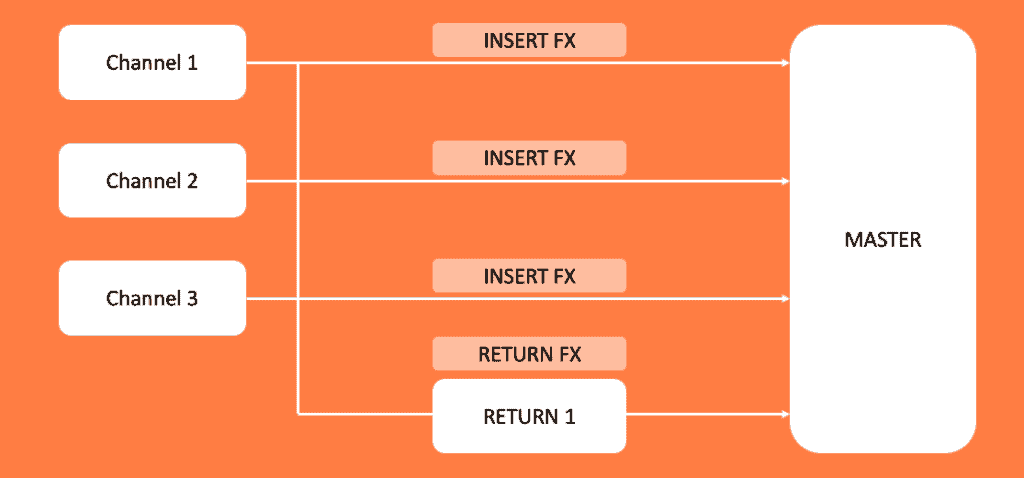
Vocal FX Chain Overview
As said, this vocal mixing chain was used by Taylor Torrence and later he showed me how to use it. It has three vocal chains that run the vocals through as you can see below: Vocal Compression Chain, Vocal Delays Chain, Vocal Reverbs Chain.

This chain is placed on your VOX bus, e.g., the channel where ALL your vocals go to, including any additional effect you add to your vocal, which will be covered on Additional Vocal Channels.
Just so there is no confusion, look at the picture below to see the exact signal chain that the vocal goes through. During our last post, we discussed how to get the best “Dry Vocal”, and now we’re going through all these other steps, channel by channel.
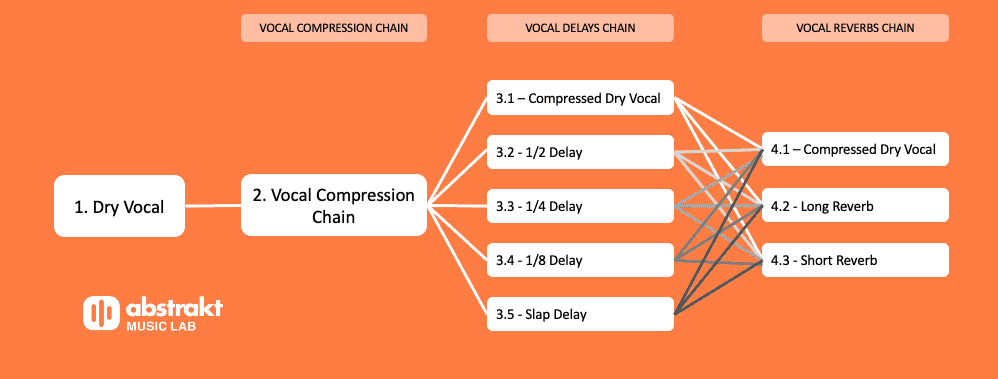
For future steps, I’m not writing any VST names as I want you to understand the concept rather than get tied to the VST. This way you can do it with stock plugins if you want to.
Step 2 – Vocal Compression Chain
This step gets the vocal compressed and makes the volume even throughout the mix. You also want to make sure that the vocal is vibrant and clean, so other plugins can be used as well. Here are the plugins you could use:
- EQ: Taking a bit of the lows, normally below 200hz (low cut), and boosting a bit of the highs. It’s the first element of the chain because you want to shape the vocal before compressing it. If you have resonating frequencies in your vocal, cut them here.
- Compressor: To make the vocal as even as it can be, run the vocals through a compressor. I normally leave the attack at 3 ms, which allows a bit of the transients to come in, and the release around 4ms. Normally I do a 4:1 ratio, but I’ve gone 8:1 and 12:1, so it’s whatever fits your vocal. By the way, I compress 2-6 dB of the vocal.
- De-Esser: Due to the sibilant sounds in a vocal (“S”, “T”, “Ch”, etc), run the vocal into a de-esser. This is nothing but a dynamic EQ that pushes the volumes down whenever there are sibilants “S” or “T”.
- Compressor (Optional): If you still feel that the vocal could be more even, compress it again with the same setting until you feel the vocal is as steady as you want it to be.
- Saturator (Optional): An idea given from Taylor Torrence, introduce a slight saturator to give a little character to the vocal. I don’t always leave it on and when I do it’s up to 20% Wet, but something you could test your vocals with.
Step 3 – Vocal Delay Chain

The second chain is the vocal delay chain, where all the delays are created as independent channels, or return channels. In other words, there are four 100% wet delay channels complimenting one 100% dry vocal. Look at the picture again:
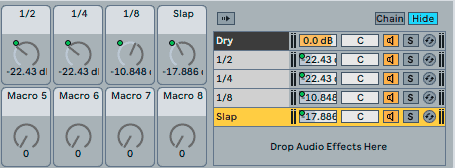
The delay channels that I have are the following: Slap Delay, 1/8th Delay, 1/4th Delay and a 1/2th delay. Take into account that the main delay is the 1/8th delay and that it is the only one with little manipulation since all other delays have some saturation, distortion or down-sampling to make them more interesting.
The volumes of the delay channels are done according to the track you have in mind. Look at how I left the volume for Find My Own.
Step 4 – Vocal Reverb Chain
Last in the vocal mixing chain, you’ll have the Reverb chain. Following the same pattern as the last chain, it’s a DRY signal combined with two 100% wet channels (Long and Short Reverb) that finish the signal flow.
All channels, from 3.1 to 3.5 go through the Dry, Long Reverb and Short Reverb independently, so this way you end up with one Dry Version of all delays, a Long Reverb version of all delays, and a Short Reverb version of all delays. Here’s what happens within step 4:
4.1 The Dry Version is, as the name says, a dry version of all delays.
4.2 The Long Reverb is an FX chain that starts with a reverb with a decay time of 6.24s. Then, it goes through Distortion, Auto Pan, and Compression to control the output volume
4.3 The Short Reverb has exactly the same FX chain as the Long Reverb, but the reverb’s decay time is 0.620s decay time (620ms) instead.
It’s important to mention that In 4.2 and 4.3, the distortion and auto pan have different settings. This is to give a unique feel to each of these steps.
Additional Vocal Channels
Although this is not part of your vocal FX chain, the examples I’ll give below are other effects that you can add to your vocal to further enhance it.
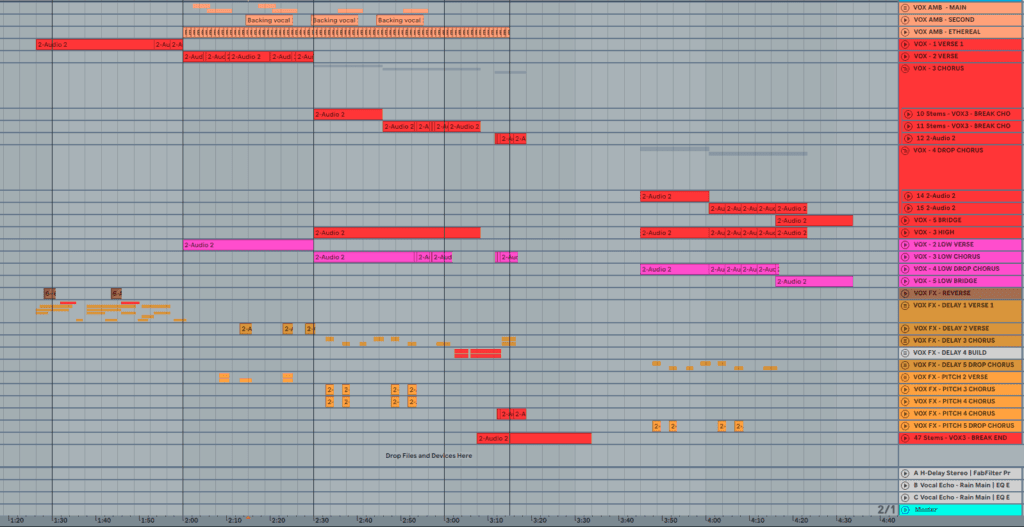
Here is the list of examples that I’ve used in Find My Own (picture above):
- Ambient Ahhs (Brown) – A steady “ahhhhhh” that is really washed with a reverb to make it more ethereal and ambient;
- Low Voice (Pink) – Pitch the voice 12 semitones down, and you’ll have a low version of your vocal. Then, I high cut it so you only get the “rumble” of the low voice. You can check exactly how I make this with this post on how to make low vocals;
- High Voice (Pink)- Pitch the voice 12 semitones up, and you’ll have a high version of your vocal. Then, I do a slight high cut to clean up a bit of the high end;
- Occasional 1/4 Delays (Orange): To stress a word or a phrase, this helps this word be more memorable;
- High Voice Occasional 1/4 Delays (Orange): Same concept as before, but with the high voice;
- Glitched 1/4 Delays (Orange): For some words, you can add 1/4 delays with glitches like Distortion, Downsample, Tape-Stop, etc
Are There Other Ways?
OF COURSE. This is my way of mixing vocals, but definitely not the only way. There is no right or wrong for mixing vocals as long as the result sounds nice.
My way of mixing vocals is a mix of these four videos below and a LOT of trial and error:
- The Recording Revolution – Rethink Vocals: https://www.recordingrevolution.com/rethink-vocals-is-here/
- Taylor Torrence – If We Say Goodbye Walkthrough: https://www.facebook.com/taylortorrencemusic/videos/619758708577969/
- Jonas Anden – How To Mix Vocals Like A Pro (Any Genre): https://www.youtube.com/watch?v=a_xoEnKh-P0&t=875s
- Make Pop Music – How To Mix Pop Vocals: https://www.youtube.com/watch?v=XJYH16OcZEk&t=868s
Lastly, there is no ‘magic rack’ for vocals. Every vocal requires special attention, especially if you’re producing different genres. Therefore, it’s important to understand the specifics of your genre and your vocalist to get the best out of it.
Now I’d Like to Hear From You
This my way of mixing vocals and the way I’ve been using to mix vocals of all my upcoming tracks
Now I’d like to hear what you have to say: Which technique from this list are you going to implement first? Or maybe you use a technique that I didn’t mention here.
Either way, let me know by leaving a comment below.