Vocals can bring a lot of emotions and feelings into your track that some instrumentals just can’t achieve. At the same time, a good vocal track depends heavily on how the vocal blends in with the instrumental and vocal mixing is not easy. Sometimes, it can take you as much time as the vocal itself and this post’s purpose is to help you with that
In full respect to your time, this will be a two post series. This first post will cover pre FX adjustments (Comping, repair, timing, tuning) and the next post will cover FX and gain staging. Here’s what we’ll cover today:
So, let’s dive in!

Vocal Mixing
Vocal Mixing is both a standardized and personalized process since you’ll go through the same steps while adapting them to your vocal at hand. That’s because vocalists have different ranges and tones, which require you to tweak these steps below according to that specific vocal that you’re working on..
Sometimes, you’ll be lucky and you’ll receive wet vocals, which doesn’t require that much vocal mixing. However, sometimes you’ll receive raw takes, and that’s when this post will be a useful guide to you. If that’s your case, follow along so you can make sure you got it all covered.
Vocal Comping
Comping, from compiling, a vocal is choosing the best take from all the performances that vocalist has sent you.
As amazing as the vocalist may be, getting the best performance of a vocal in just one take is something extremely rare. In my experience, it has never happened. Therefore, when asking a vocalist for vocals, you should always ask for at least three raw takes so you can then choose the best overall performance.
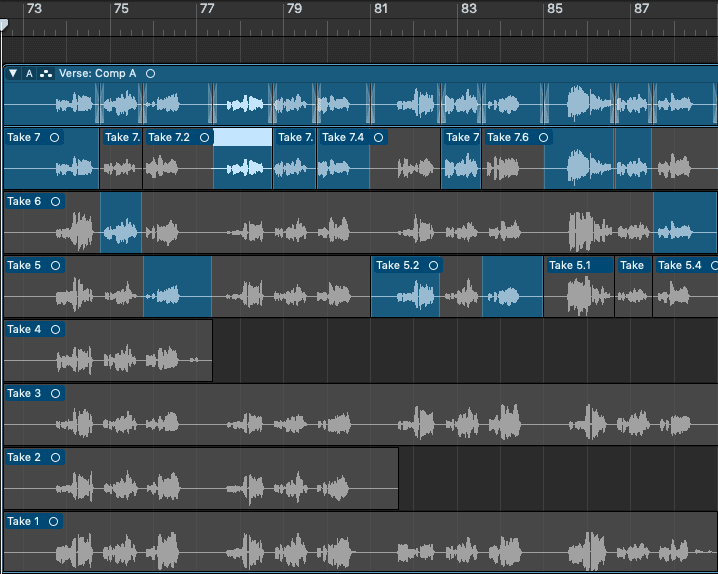
Look at the image below and you’ll see an example of vocal comping. Look at how the final “Comp A” is a combination of three different takes that have been combined into one. At this stage, what you’re looking for is the best take overall to work with.

A couple tips regarding vocal comping:
- Do the comping with the vocal in solo so you can listen to the vocal itself. At the same time, after choosing the best takes, make sure to listen to them un-soloed (in context) to make sure they work as well.
- Crossfade between takes to avoid unwanted pops;
- Watch out for the vocal tone when comping vocals. The tune of the takes must make sense and you need to avoid takes that have vocal tones or intensities that don’t match.
Audio Correction
After choosing the best performance from each take, you might notice that one piece of the vocal has a crackle, the breaths are too high, or maybe your vocalist recorded his/her voice at home and you hear some noises in the background. Now it’s the time to correct it:
You have two options here:
- Send the vocal comp to your vocalist and ask them to retake it with the vocal comp tone in mind. Sometimes this option is not available and you’ll have to work with what you have.
- Try to fix it with a repair tool like Izotope RX 7. As one friend, who is a developer at Izotope, said to me once, “RX is straight black magic” and I 100% agree. It’s amazing what you can do with De-Noise, De-breath, De-Crackle, and many other tools. Another good option that I’ve tried is Accusonus ERA Bundle.
Time Syncing
Once comped and corrected, you’ll have your vocalist’s best performance throughout all takes. However, they might not be 100% in sync with your track, and you’ll have to listen to it with your track and a metronome to make sure the vocal’s tempo matches the track’s tempo. Look at the example below to see how I did a vocal match with one vocal that I was working with:

A couple tips regarding time syncing vocals:
- Listen before adjusting. Make sure to do all the adjustments for a reason. If one part of the vocal does not need any adjustment, don’t warp it for nothing;
- Listen carefully to how they sound on and off grid. Your best option is the one that sounds best, not the one that looks best. Sometimes, what looks off grid sounds better than what’s on the grid. Weird, but it happens;
- Choose the best warping setting in your DAW. If you’re choosing Ableton, this would be Complex Pro;
- Watch out for clicks and pops since they might happen when warping a vocal.
Vocal Tuning
After time syncing, it’s time to adjust it even further. Now, we’re talking about pitch correction, which is making sure that the vocalist’s pitch is in key with the track. And, for that, you’ll be able to use automatic plugins like AutoTune Pro or Izotope Nectar, or manual plugins like Melodyne. You can read more about this in this post about which is the best vocal pitching plugin.
For this task, my tool is Melodyne and lately I’ve been using along it with iZotope Nectar to compliment it. When talking to Shane 54, former member of the duo Myon & Shane 54, about Vocal Tuning he said “I wouldn’t say AutoTune is bad, but Melodyne fits my workflow more”, and I agree. It’s not a matter of which one is better than the other, but which one fits your workflow better.
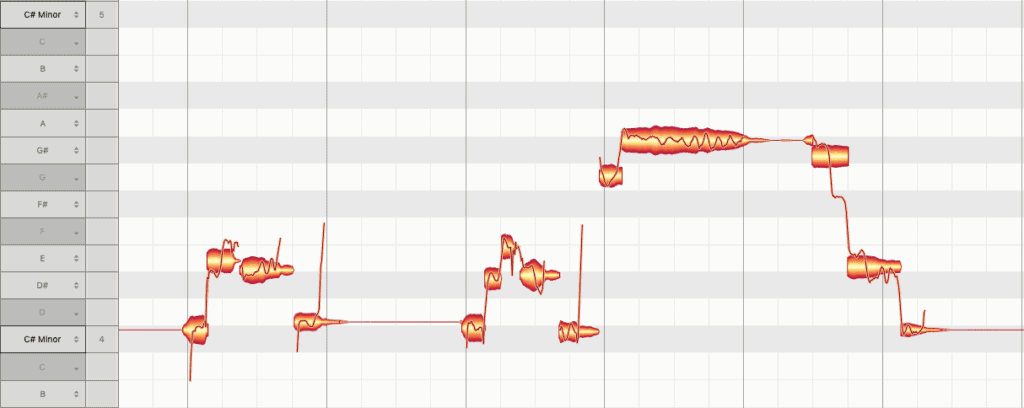
However, for this post, we’ll continue with the most visual one for the sake of the explanation and the picture below is an example of how Melodyne captures the tune of each bit of the vocal.

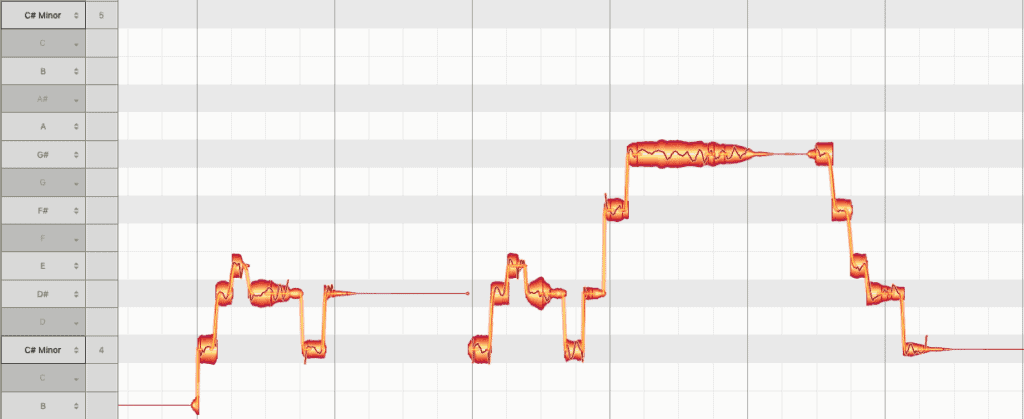
On the left bar, the notes in light grey are the notes in the key of the track while the notes in dark grey are off key. Knowing this, you’ll be able to see that some notes are not playing fully in key and I needed to do some adjustments. For example, you can see a note being sung in G whereas there is no G in the vocal scale. This is how they looked after tuning:

A couple tips for the vocal tuning:
- After the middle of the image, you can see that there is a big G# note. See how wobbly it is. That’s the vocal vibrato, which you could kill with Melodyne. However, sometimes overdoing Melodyne can leave the vocal a bit robotic.
- Listen to the vocals in solo and later in context. What fits in solo might not fit in context later.
- Avoid the T-Pain effect: Listen closely to each change you make. The changes must not mess with how the vocal sounds or cause any weird note transition like most of T-Pain’s songs. Although it can be used intentionally for R&B, I have my doubts whether it would fit for Electronic music
———————
And that’s enough for today. In Part 2, we’ll talk about the funnest part of vocal mixing, which is Vocal FX. This post was more focused on vocal correction to your track while the next one will be how to make your vocal blends in with your instrumental perfectly, ending the vocal mixing series.
Very helpful. Thanks Leo!
Thank you Chad!