Today, we’re going to talk the LOW END of your track, which is one of the most important parts of your track.

With the technique that I’ll show you today, I’ve mixed tracks that were signed to Enhanced Music, Armad, SONY and other labels, along with tracks for other clients. Check the song below to understand how heavy your basses can end up like if you apply this technique.
If you want to learn more about Low End Mixing, you can download my free ebook that covers exactly what we’ll talk about today right here. In addition to the content I’m teaching you today, you’ll get a more in-depth view of how to, step by step, put this into practice.
Here’s what we’ll cover today:
- The Perfect Sub
- Sub & Kick Relationship
- Sub & Kick Gain Staging
- What Is the Second Octave?
- Second Octave Synthesis
- Why Separate This Layer From the Sub?
- How to Separate This Layer From the Sub?
- How to Properly Set the Volume for Your Second Octave?
Let’s dive right in.
The Perfect Sub
My subs are plain sine waves and that’s it. Nothing more, nothing less. You can do it with any VST by just selecting a sine wave with no effects and you’re done. After selecting the sine wave, adjust your midi notes so your sub plays around 40-80hz.
You can always go higher or lower than that, but it could potentially cause problems.
- If you go higher than 80hz, then I don’t believe this is your sub. As said, the sub is the lowest octave of your track.
- If you go lower than 40hz, then you might not listen to what we’re talking about because you’re playing frequencies that are too low for your headphones or monitors. Personally, the lowest I go is 36,7hz (D) and if I have a C# (34,6hz) or a C (32,7hz) in my midi notes, I’d just play them an octave above (69,3hz and 65,4hz, respectively).
Therefore, try to keep your sub within 40-80hz.
Sub & Kick Relationship
What’s the common elements between a SUB and a KICK? They both have frequencies that play around the same region in the spectrum, if not the exact same. Therefore, if you don’t take good care of your sidechain, you could end up causing some phase issues, which I discuss in depth in this post, when they play together, and that’s why it’s important for you to make room for each element to play without bothering the other.
In addition to sidechaining your sub to make room for your kick, if your kick is too long you might need to sidechain it as well. Why? In a 1/4 bar, you have to make room for the kick, when the kick is the main element, but you also have to make room for your sub to play so frequencies don’t clash. Therefore, when your kick is too long, you’ll have to sidechain your kick as well.
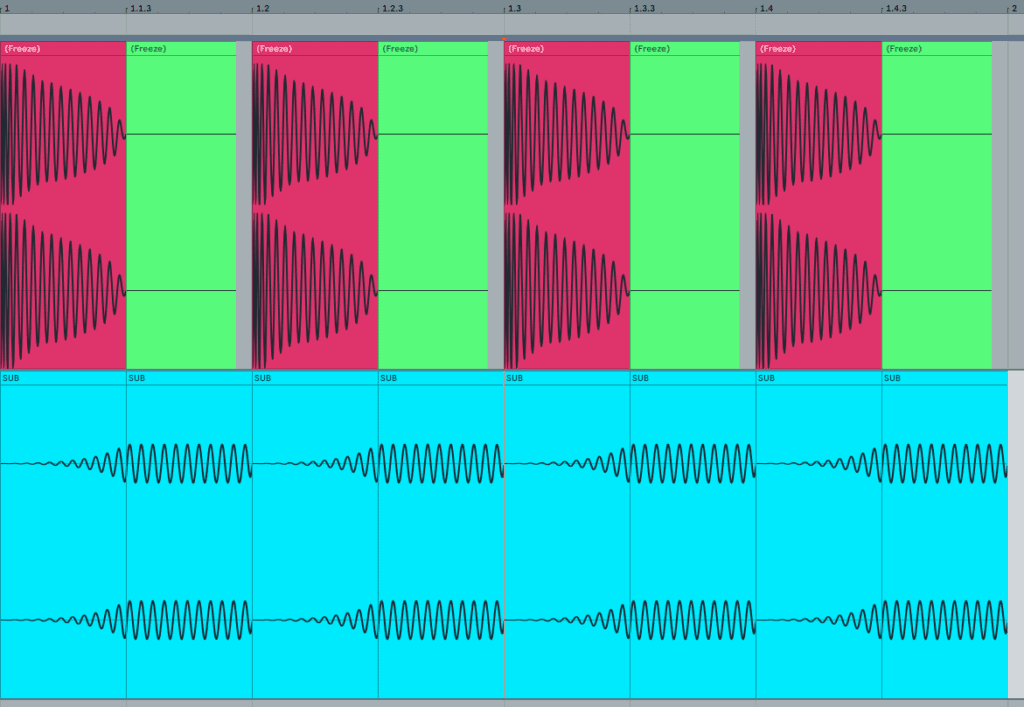
If you don’t do this, you could be facing phase cancellation or a distorted low end in the mastering stage when you start pushing the limiter. Look at the picture below to illustrate a perfect combination of kick and sub, where I’ve sidechained the part in green from the kick, so it didn’t clash with the sub, playing in the channel below in blue:
At the same time, if you’re really tight with your sidechain (drawing your sidechain to the point where the sub doesn’t slightly play along with the kick), you may have “fluidity” problems. By fluidity, I mean the flow of the track may become too static/robotic, almost like a Melbourne bounce track.
To avoid this kind of effect to your low end, you have to design a sidechain cruve that will smoothly bring in your sub according to how your kick is designed. An example of curve that could work is the following:
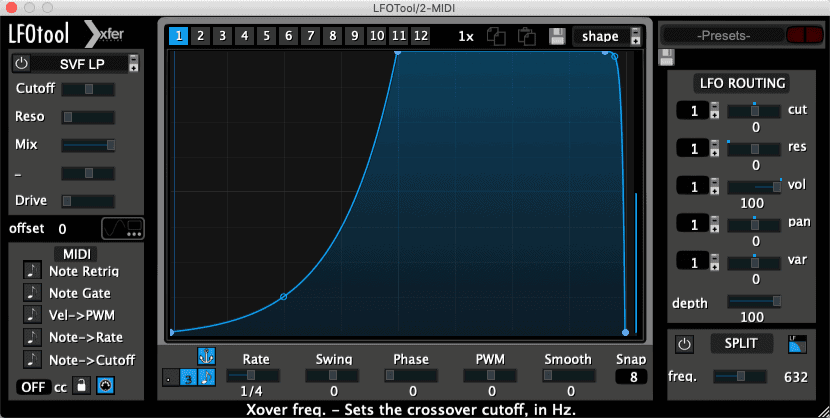
Therefore, what we’re describing is that you need the relationship of the kick and sub to be as if they both have their own space to play, but to a point where the transition between them feels natural and fluid, not robotic and static. Achieving this depends on understanding the design and length of your kick and adjusting your sub accordingly.
Sub & Kick Gain Staging
After getting them glued together with the perfect sidechain balance, you now have to set them at the perfect level. This can be really subjective because it all depends on how loud you want to leave it, but there are a couple of tricks to help you figure out where to leave them. Again, this is just an idea to solve this problem, and there are plenty of other ways.

Kick’s Volume: Pick a track from the best labels in your genre that you feel has power in the low end. If you’re not confident just picking one, pick three. After that, match the perceived loudness of the reference tracks to your track, i.e. when you toggle between A/B, they should sound as if they were in the same level. Now, pick a spectrum analyzer, like Voxengo Span, and understand how loud the kick is in the reference track.
Boom! You know how loud you can go with your kick, and since you have three songs, you can go somewhere in between the loudest and quietest kick. If you want to learn more about kicks, check this post.
Sub volume: Now that you have your kick settled, understand how loud the sub of your reference track is. Normally, they play around 0 to -3db from the kick, but I’ve seen the sub go higher than the kick, and it’s in one of my favorite trance songs (Seven Lions & Jason Ross ft. Paul Meany – Higher Love).
To understand at volume you should place your sub at, follow these steps:
- Match the tracks loudnesses, as you’ve done with the kick;
- Pick a spectrum, and check how loud sub is playing in your reference track;
- Build a relationship equation with the kick, i.e., Sub = Kick – XXdb (XX being a number), and do this for all your reference tracks.
- After doing this, you’ll be able to check that, hypothetically, one track has Sub = Kick – 1db and another has Sub = Kick – 4db.
- Therefore, based on your references kick/sub relationship, you can place your sub between 1 and 4 dbs quieter than your kick
Done! Now you know how loud you can go with your kick, and you know how loud your sub has to be compared to the kick. Pay attention that the volume of our sub will depend on the volume of our kick, so if you lower your kick, you’ll have to do the same with your sub.
Now let’s move to the “beef” of the low end, which is the Second Octave.
What Is the Second Octave?
The Second Octave is a range of frequencies right above your sub, playing the same scale of your sub, but one octave above, which will give your low end more energy and power. The best way to explain to you what I’m talking about is if you test it yourself in your DAW. Choose three songs that you enjoy and do a 48db cut at roughly 80hz (Low Cut) and at 160hz (Hight cut) so you only listen to this band.
From years of experience mixing client tracks, this is what your track may need for a more powerful low end since tracks that lack these frequencies normally sound weak and lacking energy. Do the opposite test now and either do a notch cut around 120hz so you can check how your track would sound like without this frequency range. Since it’s that important to your track, that’s why we’re exclusively talking about it today!
Full disclosure, this is how I mix all my tracks and it is just a way you can mix your tracks. You don’t have to follow 100% of what I’ll say today, but I’m sure that it can work for you if you feel your basses could be better.
Second Octave Synthesis
The purpose of this layer is to give you the richness that the sub is not giving you, and for this you need waves that are richer in frequencies like Saw, Square. Different from the what we did with the sub, I recommend you to try these waves for the Second Octave, avoiding the sine wave as you’ve used with your Sub.
After choosing your wave, it’s time to create filters to separate this layer from the sub. You can do this with a simple 48db low cut with an option 48db high cut exactly two times above your low Cut. For example, if you made your low cut at 75hz, you can high cut at 150hz to make it independent from all other channels.
Why Separate This Layer From the Sub?
The major reason you should separate the Second Octave from the Sub is to have more control with your gain staging.
Let’s say you need to lower the volume of the second octave, and only of the second octave. If you have two separate channels, one for the sub and one for the second octave, you can just use the volume knob to raise it or lower it. If these were not separate, you’d have to use a bell curves in an EQ, which can make the volume of your sub and/or second octave uneven, which would not be good to your low end.

The second reason is to make its sidechain more fluent throughout the track. While your sub will play along with the same frequency band as your kick, your second octave will have a low end cut that eliminates this conflict with the kick. Therefore, your sidechain doesn’t have to be that aggressive as it needed to be if you didn’t split these bands.
One quick example, while your sidechain dry/wet could be at 100% for your sub, you could leave it at 80% for your second octave since there would be no frequency conflicts with your kick.
At the same time that some plugins allow sidechaining according to frequency bands, like VolumeShaper, they don’t allow a different gain staging, which is why having them in separate channels would give you more control and why I recommend you splitting these bands.
How to Separate This Layer From the Sub?
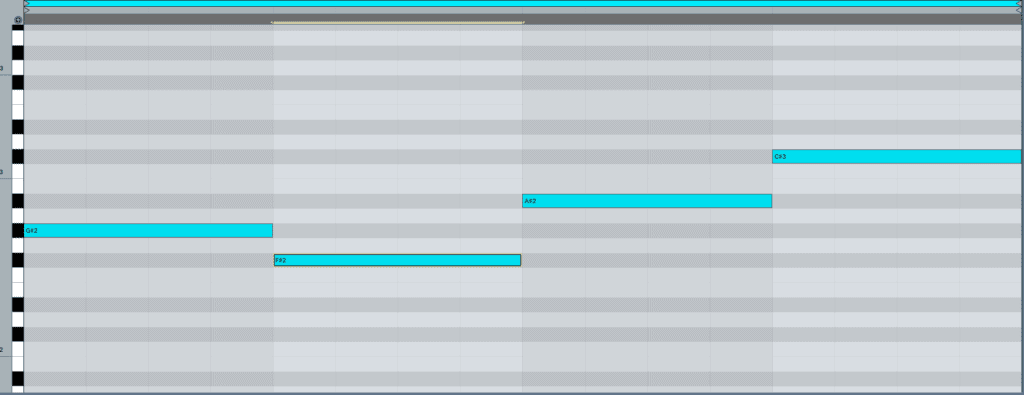
If we look at the bass progression above, the lowest note is F#1 (92,5hz) and the highest note is C#2 (138,6hz) and since this is the “second octave”, the sub would play the octave directly below in the first octave, from 46,2hz (F#0) to 69,3hz (C#1), which gives us an idea of where we could do our cuts. I
f we low cut in 75hz and high cut in 150hz, we create one band for our second octave from 75-150hz and would leave one band from 00-75hz for the sub. If you check the notes we play and the ranges we’ve created, both ranges contemplate all the notes being played there, and by doing this, we’re making sure to have two channels that don’t relate to each other and are now easily manageable.
One important thing, though… Since these high and low cuts will be precise cuts done with a 48db low/high cut, some phase shifts can affect your sound. It could be noticeable, but it will all depend if you like the resulting sound. If you do, go for it!
How to Properly Set the Volume for Your Second Octave?
As I’ve said, the main reason why you should separate your sub and your second octave is to have more control when gain staging them.
As we’ve done with the sub listen to your references and check the relationship it has with the kick. Let’s say one reference leaves the second octave around 6db quieter than your kick, this would give you the first volume equation: S.O. = Kick – 6db. After that, listen to another reference track and let’s say now it is 2 db quieter than your kick, you’ll have your second equation: S.O. = Kick – 2db.
Now, you can decide whether to leave your track from 2db to 6db quieter than your kick since you’ve liked these settings before. As a reference to you, my preference is to leave the second octave around 0 to -3db quieter than the volume that I anchor my kick at. However, again, it’s up to you to follow or not this suggestion.
———————
Now it’s your turn
By getting your second octave and sub at the right level, I guarantee you you can make your low end more powerful and energetic, provided that it needs change. Test it and I’d love to know how this works out for you so experiment with this and let me know if this works
Post one track that you’ve applied this technique to and let me listen to the result!
Or, do you treat your low end in a different way? I love discovering different ways to deal with this low end issue, so let me know if you treat it differently!
If you want to know more about mixing, you can watch I mix track from a client in this post or also grab our free 35 mixing tips ebook over here.
great article!
thank you so much mate!
Brilliant article, really well written and easy to understand
Thank you James!!