Today I’m going to share with you my top 10 mastering tips I wish I knew when I started mastering my tracks.
Over the years, along with all Leo Lauretti tracks, I’ve mixed and/or mastered some other tunes in the progressive trance and progressive house industry, like Paul Arcane’s Everest, and I’ve learned a few things that I’d like to share with you. Listen to Paul Arcane’s track below:
Regardless of your genre, mastering can be daunting, especially if you’ve never done it before. Not only because it requires time and experience to understand the purpose of it, but also because one mistake could ruin it all. If you want to go a step before mastering, you can check out our post on 10 tips for a better mix or you can check my top 6 mixing and mastering tips as well.
Therefore, to make sure you enhance your skills, get better at mastering and never ruin your track while mastering, I’m sharing my top 10 tips for you to apply to your next master. Here are the tips I’ll go through today:
- Study & Practice are CRUCIAL
- Understand the purpose of Mastering
- Referencing will help you tremendously
- A well-done mix is the key to an easy master
- Understand the difference between loudness and levels
- Know your plugins inside out
- Less plugins equals more control
- The volume build up trick
- The mono build up trick
- Develop a go-to Mastering Chain
Let’s dive right in!
Study & Practice are CRUCIAL
Mastering requires study and practice. It’s such a crucial, technical and delicate part of your song and one little move could mess up the whole song.
There are plenty of ways that you can learn what mastering can do, and I suggest you first understand what it is about by watching this series by Izotope:
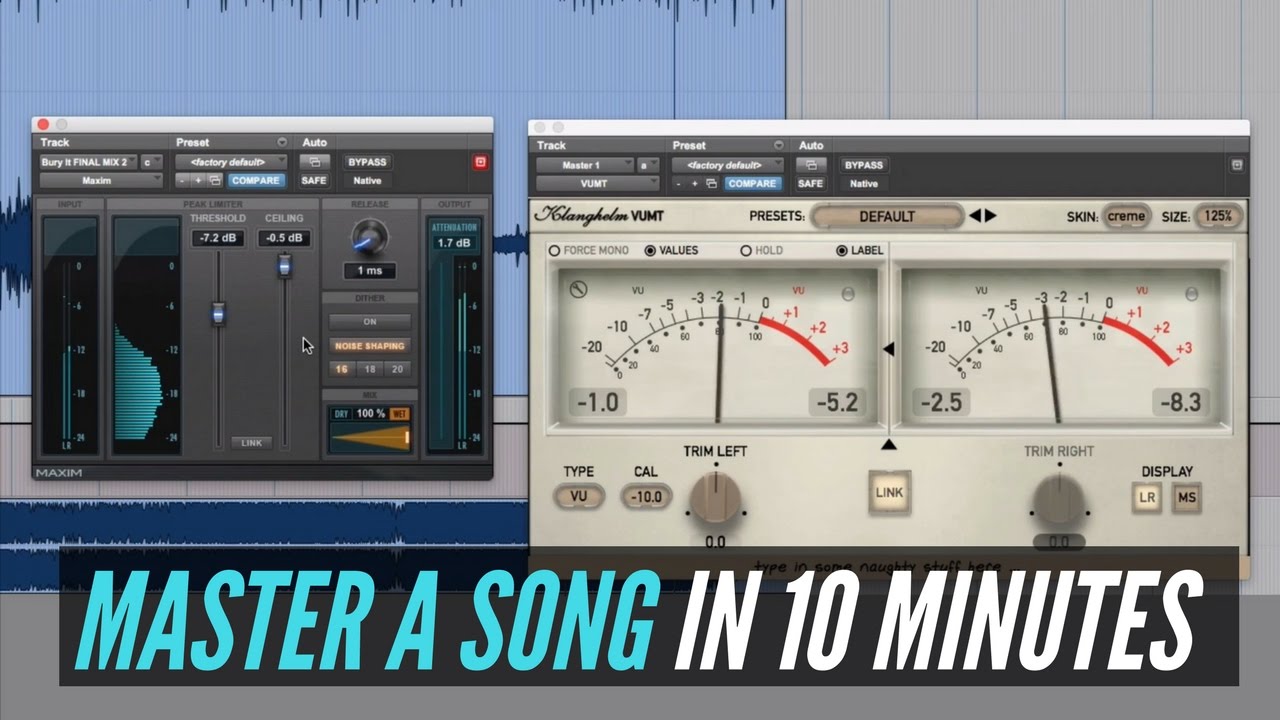
Or videos in the Recording Revolution’s channel, like this one below:
The most important part of getting better at mastering is practice. Without practice, you won’t be able to apply what you’ve learned. Not only this, but without practice you won’t be able to tell if any of these techniques work or not.
What is practice when mastering? Insert a plugin, test it with it, without it. Try a different plugin that does the same thing, test it with it, and now try the other one. It’s literally trial and error until you find something you like.
Therefore, tip #1 is you NEED to practice what you learn and you NEED to carefully pay attention to how every action alters your final result.
Understand the Purpose of Mastering
Why are you mastering your track? What are you expecting from mastering? If you hire an engineer, what are you expecting from it?

Mastering is the last check you’ll give to your track, so you have to make sure everything is ready to be distributed, and that involves making sure that your track is:
- Properly formatted to all media sources you’re planning to release your track;
- At the same volume as other tracks commercially released or throughout an album;
- At the same level of compression, imaging, character of other tracks commercially released and/or throughout an album.
At the same time, you’re not supposed to do huge dips in the low end or the high with EQs while mastering. That happens in the mixing stage, no matter how tempting it may be. Although you could do some slight editing of your mixing, remember, your main task here is to make your track ready to be distributed.
Tip #2 is simple… Understand that mastering is not supposed to save your mix and only to make it ready to be distributed.Ideally, your mastering enhances your track, but not transforms it.
Referencing Will Help You Tremendously
If you’re mastering, you’ll need other tracks to at least understand if your track is loud, compressed, wide, mixed enough, etc. In addition to all that, listening to references can help you unbias your ears from all the time you’re spending listening to only one track.
Referencing offers you the benefit of testing your track against tracks that are already in the market so you can understand, for example, how loud your track needs to be or at what volume you have gone too far with the limiter. In addition, you can check how much compression your track has compared to the reference, how much wider it is, etc.
Lastly, as said, if you’ve been listening to your track for the past hour, most likely you have fatigued your ears. Listen to reference tracks, get some new input and I’m sure that this will help you “rest your ears” and come back to your track with a better mindset.
Tip #3:
- Pick tracks you like and that are similar to yours so you can compare the volume, loudness, compression, imaging, etc;
- Put both tracks in the same perceived loudness, i.e, they have to sound similar in volume;
- Start comparing them and get all the information you can from your reference tracks.
However, there are some common truths/questions/mistakes that might make you wonder. Therefore, to clear things up:
- You don’t need one track in the same key as yours;
- Preferably, they are in the same genre;
- Preferably, they are similar in arrangement (Vocal tracks vs Vocal Tracks, for example);
- If you’re listening to distortion or your song is hitting red, you’ve gone too far.
You Don’t MIX in Your Mastering Session
This is so important that I’ll repeat it: your mastering is not supposed to drastically change the sound of your track, that’s the mixing’s job.

When mixing a track, you can:
- Tweak volumes higher or lower;
- Enhance the low end;
- Boost the high end;
- Do big EQ cuts/boosts;
However, when mastering, as said before, you avoid these at all costs. If you feel you need to do a big EQ boost in the master, do it in the mix since doing it in the master could mess up your mix’s dynamics.
What about saturation? Well, I don’t like putting anything that changes the sound of the track directly on the master. So I would say NO to saturation in my mastering chain.
At the same time, I see a lot of producers doing that in their masters and having good results. One really popular mastering plugin that I don’t like using is the saturator Oxford Inflator. JAUZ, for example, uses the Ozone’s Exciter in his master in this video:
Ultimately, tip #4 is don’t mix with your mastering chain. Mix with your mixing project and do it all there. If you see yourself doing any drastic change to your master, question if that shouldn’t have been done during your mix.
Understand the Difference Between Loudness and Levels
The loudness war got a break since major platforms started to normalize the loudness in LUFS. However, there is a huge understanding gap between Level and Loudness, and here is where the confusion lies.
Level is an objective electrical measurement (SPL, RMS) while Loudness is a perceptual and subjective measurement that varies according to many aspects. Tracks with similar levels may have different loudnesses and this majorly relies on the way they were both mixed, and that’s where the problem lies.

When you don’t correct “problems” in your mix, for example, in your low end, you won’t be able to push your track as loud as if you corrected them. In the end, you won’t be able to push your limiter as high as your reference tracks without causing distortion and this might confuse you since they could have the same level, but different loudnesses.
Tip #5, if you’re not being able to get your track loud enough to your reference tracks even though they are at the same level, your answer might not be in your mastering settings, but within your mix.
Know Your Plugins Inside Out
What is an EQ? What is a limiter? What is a compressor? Why do I need them during my master? You should be asking yourself these questions so know their purpose on your master.
Let’s take EQ in mastering as an example. What’s the purpose of EQing on the master? When should you consider EQing in the master and not in the mix?
Learn how to manage your vsts and why/how are they used in mastering so then you can start applying them to your tracks. If you’re interested, the iZotope series mentioned above has an episode exclusively on EQing in mastering:
Study is crucial, as said in tip #1, because by understanding your plugins you’ll know when you should use them and when not to use them. Not only this, but you’ll absorb more information from tutorials as well, going from copying a chain to understanding the concept of the chain.
For example, if you add a plugin and someone asks you why you added it, you must have a reason for everything that you’re doing with it, even if you say “When comparing on/off, on sounds better”. Of course, you need to explain why and what makes it sound better.
If your answer is “I saw someone doing this and I’m doing it this way”, you have the wrong reason for using a plugin.
Tip #6 is if you’re using a plugin in your mastering chain, you must know how to control it and use it. Otherwise, it could cause you more problems than benefits.
Less Plugins Equals More Control

After studying your plugins, it will come down to what you can do with them now during your mastering stage. A good way to start a mastering chain is to start with the basics.
At first, limit yourself to three main tools while mastering: EQ, Limiter and Compression. There are a bunch of other things you could use in the master chain, like Multiband compressors, imagers, saturators, but keep it simple at first.
By limiting your options to these three tools, you’ll be in far less danger of messing up with plugins you’re not familiar with. If, for example, you are a little afraid with compression, read this and take this off and only work with EQ and Limiters.
After you get comfortable with the initial effects you’re adding, start adding more and question yourself every time if that makes the track better or worse. Some types of plugins you can add later on:
- Imagers to make your tracks wider.
- Multiband Compression to make your compression different in every band
- Saturators or Exciters to slightly enhance the character of your sound
Tip #7 is to keep your mastering chain simple. The less plugins that can get you to where you want to go the better since there will be less things to manage and to ruin your master.
The Build up Volume Trick
The build up is the moment leading up to the drop, where a wall of sound smashes your speakers and you get all the excitement. In that sense, one key element of your drop is how effective the impact of your drop is, which you can manipulate with volume automation.
Humans are really good at perceiving differences. Looking at the photo below, you’ll most likely notice that there is only one black pond instead of noticing that there are mainly white pieces, correct? Therefore, let’s use this to our advantage and apply this concept to mastering to make our drops more impacting.

Tip #8 is to make this impact more apparent by creating an automation 2 or 4 bars before the drop with a 0.0db to -1.5 db volume dip. This will create a sense that the drop hits harder than before, even though you didn’t act on the drop. Basically, you’re fooling the listener’s brain by making the volume difference between the build up and the drop bigger, which will create the sense that the drop hits harder.
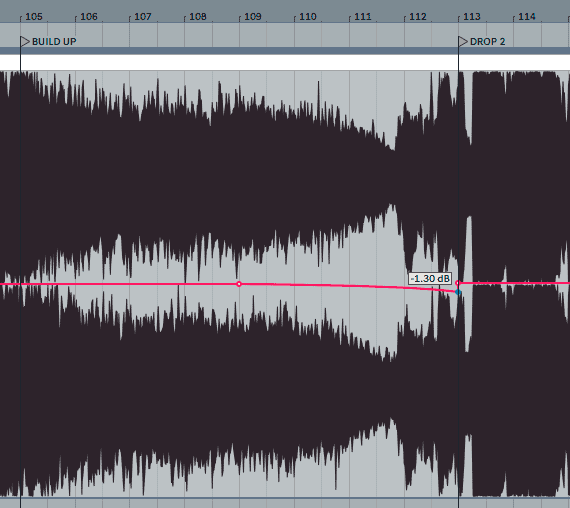
Important notice: To achieve better results, calibrate this according to your track. A drop where the build up goes too quiet and then hits is also not desirable. If you have doubts that you’ve gone too far, check how your reference track is doing.
The Build up Mono Trick
Exactly the same as the volume automation I just showed you, you can also create the sense that your drop is really wide by making your build up more mono. Again, you’re not changing the drop, but you’re fooling the listener’s brain by manipulating moments that precede the drop, which makes it indirectly wider, and that’s tip #9.
For this, pick a Mono/stereo tool, like Utility on Ableton or Stereo Fruity Shaper for Fl Studio (all DAWs have one natively), and create an automation in the last 4 bars, like the image below:
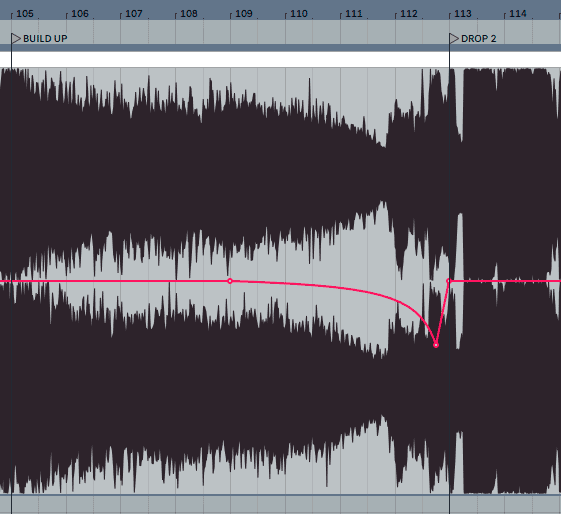
Imagining you could go from 0 to 100% mono, I’d recommend not going as far as 35%. This, again, has to be adjusted according to how it sounds and overdoing this would make this seem unnatural, and it will sound like a mixing mistake.
You can check this tip #9 and tip #8 over here:
Develop a Go-to Mastering Chain
Make a chain and stick with it the most you can. You can always experiment, but that will cost you time and effort, so, once you get your ideal chain, stick with it!
Making your ideal chain is not something easy since there are A LOT of plugins out there and to make the most informed decision, you’d have to test all the possibilities, which is impossible. Therefore, you must try different plugins to understand which you like the most.
For example, let’s say you’re using a glue compressor. You have Cytomic’s The Glue, UAD SSL Comp, Waves SSL Comp, Ableton’s Stock Glue Compressor, and many other options. It shouldn’t be the one that sounds closer to the original SSL Compressor, but the one that sounds the best to you.
To make an informed decision, however, testing it on one track might not be enough. After you’ve chosen the one you like the most, try it in one or two more tracks, and check if the decision holds out. Then, do the same with Limiters, EQs, Imagers, etc.
By doing this, you’ll have the ideal pieces of your mastering chain and you’ll be able to do a go-to rack. You can always try others, but these are certain to achieve the best result you can for your track, and that will speed up your process by not having to think about “what plugin do I add next?”, and that’s tip #10.
In my ideal chain, for example, I use the following plugins:
- Utility (Ableton): Volume control
- EQ (Fabfilter Pro-Q 3): Low End cut
- OTT (Xfer): Multiband compression
- EQ (Ableton): EQ adjustments and High End cut
- Glue Compressor (The Glue, Cytomic): Bus Compression
- Ozone 9 Imager (iZotope): Imaging
- Utility: Volume and Mono/Stereo automations
- Ozone 9 Maximizer (iZotope)
Now it’s your turn
There you have it: my list of 10 top mastering tips that I would give you to kickstart your mastering training.
Now I’d like to hear what you have to say:
Which tip from this list are you going to implement first?
Tell me which one in the comments below!
![Paul Arcane - Everest [OUT NOW]](https://abstraktmusiclab.com/wp-content/cache/flying-press/562c859a386388ed78b6afea4f0e1d2a.jpg)
