Mixing and mastering are an intricate part of music production and having a proper workflow is key for an effective outcome.
Whether you do it yourself or hire an audio engineer to do it, your track can’t get away without a proper mix and master. However, if you don’t have a proper workflow for it, you could run into several problems that can make your mix and master last a LONG time.

What steps do you take to mix and master your song that makes this process consistent and also gets you to finish tunes faster, as mentioned in this post? None? Hold on tight because, in today’s post, we’ll talk about how to develop a workflow for mixing and mastering.
A mix and master workflow is a streamlined and bulletproof series of steps in which you’ll process your elements within a mix, adapting it to your desires, but keeping the process fast and consistent with your other songs. The objectives of developing this workflow are to:
- Get consistent results throughout your mixes
- Avoid wasting time with unnecessary tasks;
- Avoid overworking your track when it’s done;
- End your mix and master faster;
- Have more confidence that you’re on the right path;
Here are the topics we’ll talk about today, although, for this post, I recommend you to follow it as it is outlined:
Let’s dive right in
Your Mixing Starts Before What You Imagine
How do you know when your song is ready to be mixed? Have you ever spent so much time on a tune you didn’t know when it was time to mix it?
Mixing actually starts before you even start calling it “MIXING”. In simple terms, Mixing is balancing the sounds in a track so they sound good together, which is something you normally do (or should do) while you’re creating as well.
Therefore, mixing is not something you do only when you finish it, as many believe, but a task you do throughout the song’s creation as well.

At the same time, after you finish creating your track, I highly recommend that you do a separate mix and master process, and I’ll explain later why. First, let’s talk about the steps of this workflow, which you should do while still creating your tunes.
One disclaimer though: in my post about referencing, I mentioned how I use it to adjust the gain staging and to understand the kind of character sound I want to go to, but that’s not exclusive to the mixing stage. Since you will be doing this while you create your song as well, I highly recommend you to have a reference track ready for this stage.
Mixing While You Create
My music sessions normally have only one main objective per session since I batch a lot of my tasks.
I often sit to only develop ideas into songs and arrange them properly. At other times, I sit only to balance the songs I’ve developed and do a little premix inside these projects. “Frequency wise”, for every two creating/arranging sessions, there’s one cleaning/premixing session.
In these premixing sessions, the only goal you’ll have is to make sure everything is sounding how it should and how you wanted. If it’s not, now it’s time to put it back on track.

For that, you’ll possibly need to do some adjustments. The focus of these adjustments will be to:
- Create space and focus your mix on certain elements. Let’s say you have a piano/pad and a bass, in this stage is where you would low-cut the piano/pad so the bass shines through, but also high-cutting the bass so the piano/pads get that space. The idea is to give focus to the main region where you want these elements to shine;
- Balance the levels of the elements: Mess around with the volume of the elements. Compare what you’ve done to reference tracks, as mentioned here. The idea here is to do a quick balance of the levels of your highs, mids, and lows so it matches the vibe and intention you’re going for. This could either be done with EQs or the channel’s level.

- Check if you need extra/fewer elements: Now it’s the time to question whether you need all the channels you have in there or if something is missing. Most likely you’ll notice this because you’ll not be able to make the sound like you wanted because you’re adding more or fewer channels than what you should;
- Check if your song sounds good in Mono: Does it lose too much energy when you put your song in Mono? If so, you have to do something to regain that mono field. A song must not lose energy in mono and you can’t lose major elements when you check in mono.
By checking these elements, you’re making sure to put your song back on track if there’s something missing or extra, which will save you some time when you finally go to the mixing stage.
Watch Out for Overworking Your Song
However, this can be a never ending process since it could lead you to overworking your track. After all, how would you know if you need extra or less elements or if the high end is too high, for example, if you’re possibly not comfortable with mixing? That’s why you have to make sure you have a few things checked first:

- DISABLE YOUR MASTERING CHAIN: In bold and caps. If you’re creating your track with your mastering chain, it might be harming more than helping you. I’ve once created a song that whenever I disabled the mastering chain, the song fell apart. In other words, the mastering chain was mixing your song… Avoid this AT ALL COSTS and create without the master on;
- Make your adjustments objectively: You must do the steps mentioned in the previous block until you’re satisfied with your tune, which is HIGHLY subjective. Therefore, you need to make this more objective and one way is by Referencing. You need to know when to stop doing a certain adjustment and a reference song can help you to not over adjust or under adjust. You can view more about this in this post.;
- Feedbacks give you an extra layer of security: After doing the adjustments, you’ll need to make sure what you’re doing is also perceived by others as the right move, so feedback from people you trust is key. In fact, let’s go more in-depth about this.
Feedback
After finishing the adjustments you wanted to make, it’s feedback time!
View this stage as your tune’s beta test, i.e., the first experience you’ll have with it out in the real world collecting information from possible listeners. Why? Most likely, this feedback can provide information on areas you were not spotting, but which demand some attention.
Send the song to two friends you trust, or you can send me the song for detailed feedback on your track here, and correct what your friends are mentioning if you feel these should be corrected. A good feedback looks somewhat like this:
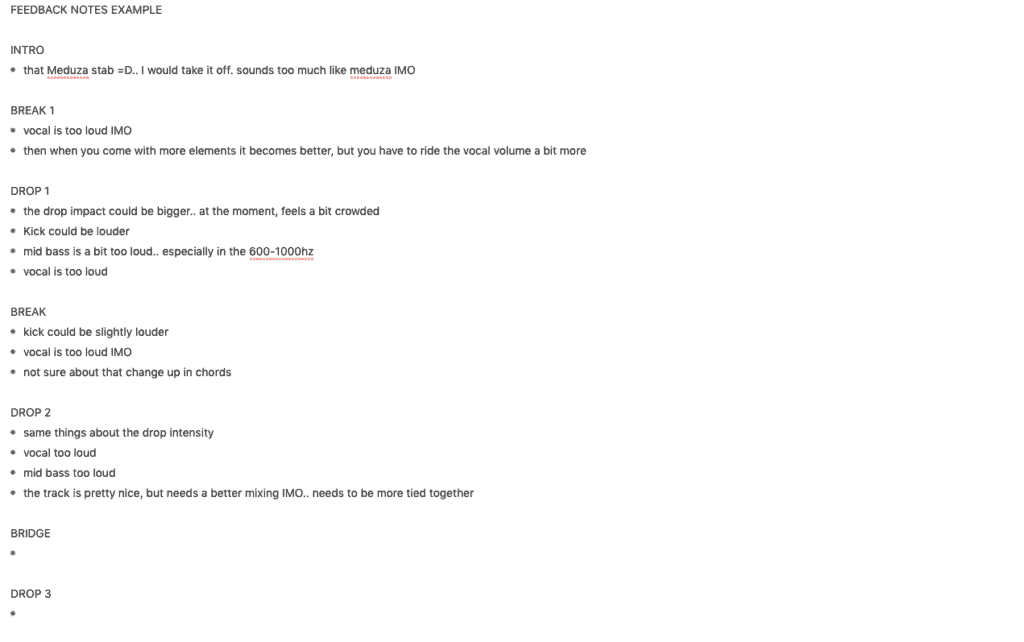
You should have a fact-based approach with these feedbacks:
- If Feedback 1 mentions that the low end is too loud, ask feedbacker 2 if he agrees with that and ask yourself if you agree with that.
- If more than two people, including yourself, agree with the same comment about something in your song, most likely it needs to be changed. You don’t necessarily need to change it, but I highly recommend checking it at least.
Feedback collected, time to do some adjustments as mentioned in the previous block. After doing the corrections based on this feedback, it is always nice to follow up. This way you know if the adjustments you’ve made corrected the problems you were having before according to someone’s view, not only yourself.
Premix Workflow
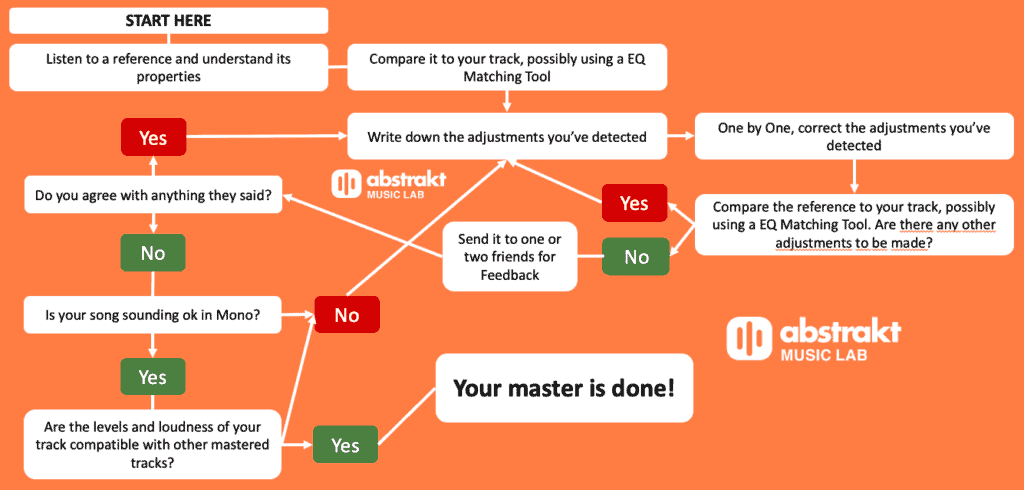
If we were to put all these steps I’ve just mentioned to you in a workflow, this is how it would look like:
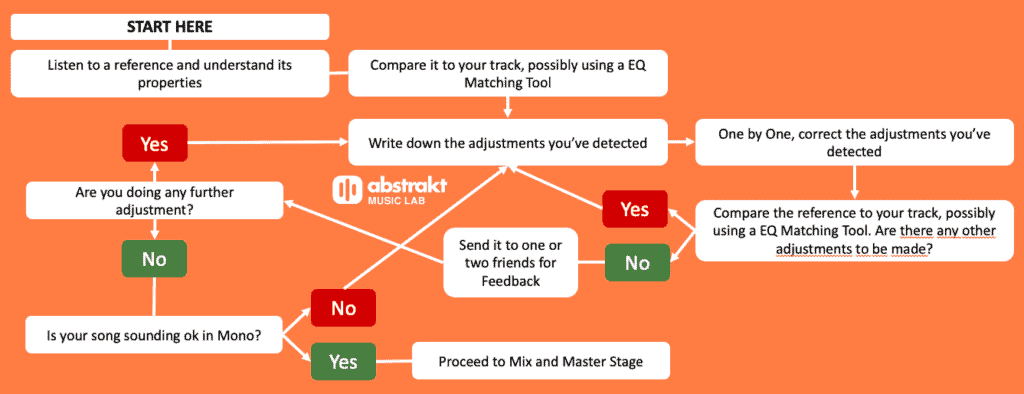
- Listen to a reference track and understand the dynamics of the song, the character and loudness of the elements, etc;
- Listen to your tune and compare it to the reference you just listened to, possibly use some sort of Eq Matching tool. Some adjustments will probably arise in your mind;
- If you detect anything you need to do, write down the adjustments you’ve detected on a piece of paper or in a note-taking app as to-dos. By writing these down, you will avoid doing tasks you don’t really need to do and only will focus on what you have to do;
- Correct all the adjustments you’ve written down;
- Recheck your song in the EQ Matching tool. If you have any further adjustments to be made, go back to step 3. If you don’t have any adjustments to be made, go to step 6;
- Send your track for feedback and wait for your friends’ response. Combine the responses and analyze what needs to be corrected according to your friends;
- If you agree with what is mentioned and detect new adjustments to be made, go to step 3, and if you don’t have anything to change, just skip to step 7;
- Check your mix in mono. If it weakens too much in mono, if an element disappears, correct this and go back to step 3 and correct it. If you’re ok with this, proceed to the mix and master Stage.
These are the steps I follow for ALL my premixes and it just makes the process accountable with feedback, personal preference and safety checks, steps that are crucial for a mix.
Exporting Stems to Mix and Master
Now that you’re approaching your mix and master, you have to decide whether to do the mix and master in the same project or in a separate project. I highly recommend you to do it on a separate project because it helps you by:
- Starting fresh with a new project with just stems, not VSTs;
- Differentiating the creation mentality from the mix and master mentality;
- Saving CPU since none of the VSTs you’ve used will be there;
- Avoiding doing unnecessary changes within VSTs since these will be in audio.
More importantly, what will happen to your projects in 5 years? Will all the plugins be compatible? That’s the main reason why I export all my channels to stems before the mixing project and why I recommend doing a mixing project in a different project!
To do this, you should be specific with the stems you’re exporting and you should set a proper naming method to label your channels.
Labeling
In my projects, I always have these BUS groups in my mixing project:
- Kick & Sub
- Drums
- Break
- Drop
- Bass
- Vocal
- FX
And my mixing project will normally end up looking like this right after importing stems to start this stage:
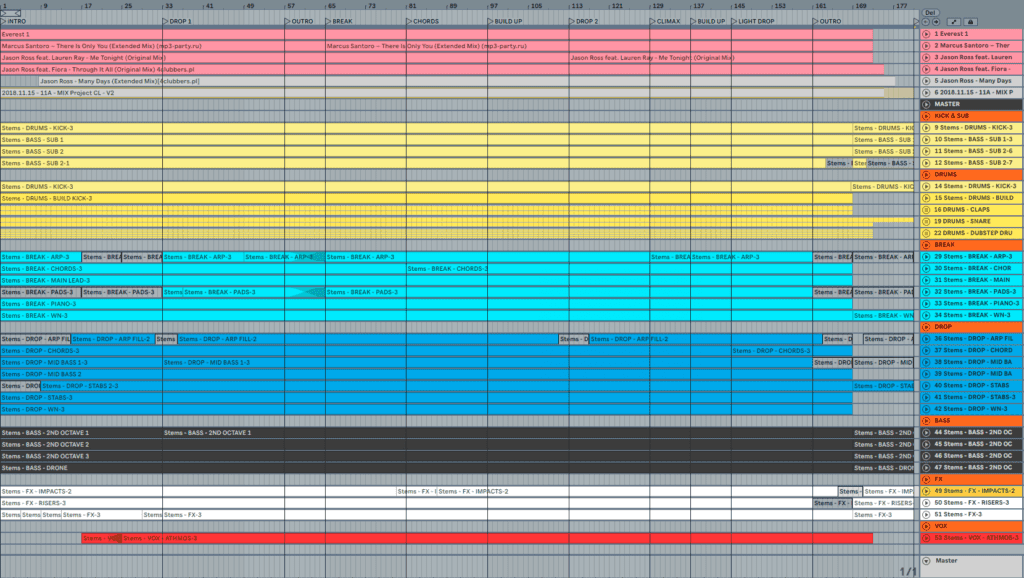
All the channels inside these buses represent an element from the creation project. For example, if you look inside the Break section, these are all the groups of elements you’ll find:
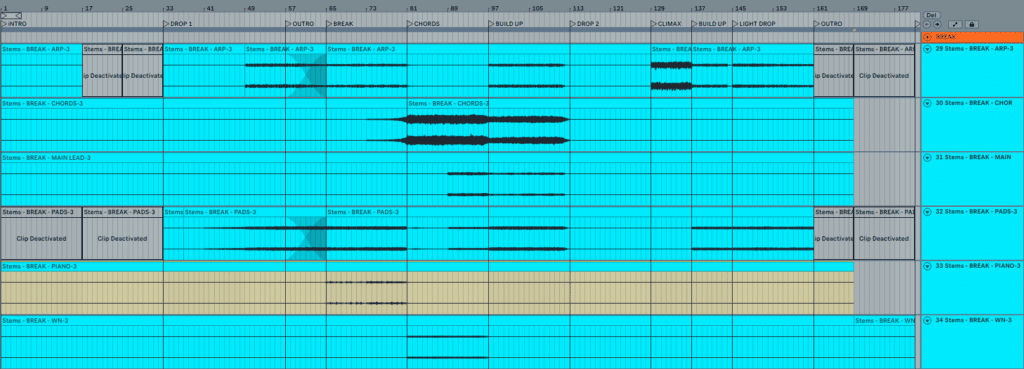
These stems are composed either by a single channel or a group of channels that have the same purpose in a Mix.
Look below how the BREAK – CHORDS is composed by the group of chords, but the stem BREAK – WN is composed of a single channel. This happens because every stem in the mixing project is composed of a group of elements with a similar sound in the creation project.
Therefore, for example, all chords are exported as BREAK – CHORDS, same for arps, white noise, etc.
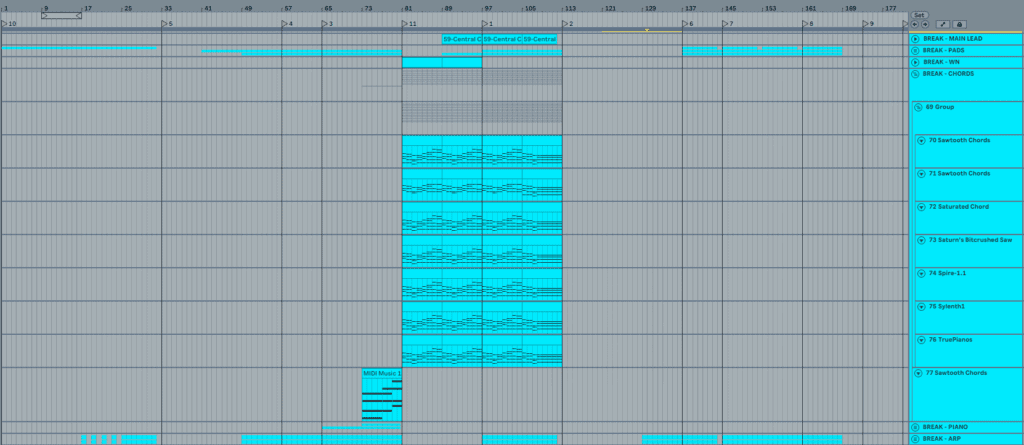
The benefit of always having the same buses and creating a naming system for yourself is that it makes it easier to understand the kind of treatment that channel needs to have.
If you always have a DRUMS – HIT HAT, you can always treat it the same way. If sometimes you name it like HIT HAT, other times like HATS OPEN, other times like HATS, this would require you to stop and understand what kind of channel is that and if how can you mix it.
The more familiarity you have with the workflow, the easier and faster your mix will be.
Important Mentions:
- NO CLIPPING: In caps and bold again since this is REALLY important. Make sure no channel is clipping. If it is, re-export your stems 5DBs quieter or as much as needed to not clip;
- You can’t have two stems playing the same elements: All the stems have to be composed of unique elements. For example, if you have a group within a group, you can’t export both to the mixing project. You either export all groups within a group or just the major enclosing group.
Mix and Master
Project Preparation
Before starting your mix and master, you need to follow a couple of steps to make this mixing and master stage the most familiar process to older mix and masters you’ve already done:
- Mix and Master Template: If you’re always exporting the stems of your projects, and you always name them the same way, why not have a template? This is my template, for example, where I just import the stems in, and all the channels come with an EQ, the Master chain is already there so I don’t have to recreate it. If you want to grab my template, check out this post or just go directly to our Free Downloads section.
- Master Chain ON: While the creation stage HAS to be done with the master off, after exporting stems, I start my mastering process with my master chain ON in the channel in BLACK called “MASTER”. I want to listen to the mix now as it would be when mastered, but this is a questionable step to many people and if you want to do a separate mastering project, that works as well;
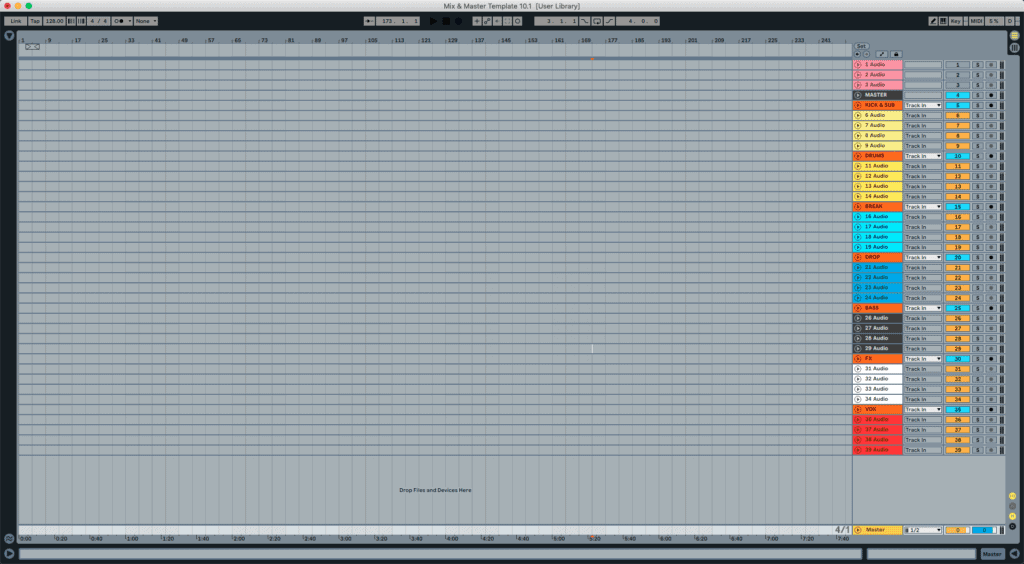
- Reference Tracks: After importing the stems, import your reference tracks and make sure that the references are as loud as your tune with the master chain. See those three pink slots on top of the template, these are for references with hot cues so I can easily toggle solo mode for them (Number 1 solos the reference 1, #2 the second, etc).
- Adjust the levels in your master chain: Since you have a standard master chain on your “MASTER” channel, make sure your song is never hitting levels above -8RMS (which is the level I use) but it’s also at the same loudness as your references.
Done all this, you’ll have almost the same stems as in other mixes, with the same coloring, at the same positions, already premixed.
You’re making your mixing process the easiest and the most familiar possible to avoid getting overwhelmed with a “what do I have to do next” since you’ll follow this workflow for EVERY mix and master you do. And, with practice comes perfection. After a while, you’ll be able to prepare your mixing projects without even listening to them.
Mixing and Mastering
After you’ve set your project to how it needs to be for mixing and mastering, it’s time to start your mix and your master. However, honestly, you already know the process. Remember that premix workflow? It’s almost the same!
The underlying principle is the following: If you’re always doing the same steps, you’ll consistently get the same results from your workflow. Of course, you can always improve it, but at least what you know and have done for previous projects will always be taken into account during future mixes.
Not only this, but if you’re always following the same steps, more than likely you’ll get better by specialization. The better you get, the faster you can go through these steps the next time.
So, your mixing and mastering process is nothing more than a continuation of your pre-mix, and you’ll follow the same steps you’ve done before, now with one additional step:
- Mastering Chain ON: If your mastering chain was off, turn it on right now. If it was on, just skip this step.
- Checking the loudness: After checking if your song is ok in Mono, you have to check if your song is at the same level and loudness as your reference tracks. As mentioned in this post, if you’re not as loud as your references but the level (RMS) of your song is matching the competition, then there might be something wrong with your mix. If that’s your case, go back to step 2 and recheck your mix.
- If your tune is ok, YOU MADE IT!
Now It’s Your Turn!
There you have it! This is my way of making sure that my mix and masters always go through the same steps whether it’s for a client or for my songs.
With this workflow, you can guarantee the same quality or better as the previous ones, as well as always getting a little faster at going through them, and avoiding unnecessary work from unnecessary tasks that your mind may throw at you! If you want to read about my top 10 mixing tips, check out this post!
Is that something you feel you can implement into your process? Do you export stems when doing mix and masters? Which step of this workflow will you implement to your mixing process?
Tell me more about your mix and master workflow in the comments below!
Excellent article Leo – very clear and easy to understand. Thankyou!
Glad you liked it mate!!! Appreciate the comment!
Thank you!
Welcome broo!
This rather valuable opinion
Thanks for the comment bro!